| “This site contains affiliate links for which OEMDTC may be compensated” |
NHTSA Campaign Number: 17V834
Manufacturer Maserati North America, Inc.
Components FUEL SYSTEM, GASOLINE
Potential Number of Units Affected 1,406
Fuel Leakage Within The Engine Compartment
A fuel leak within the engine compartment increases the risk of a fire.
Summary
Maserati North America, Inc. (Maserati
 ) is recalling certain 2018 Maserati
 Quattroporte and Ghibli vehicles. These vehicles have a fuel delivery pipe in the engine compartment that may leak fuel at the connections.
Remedy
Maserati will notify owners, and dealers will install a new fuel delivery line kit, free of charge. The recall is expected to begin February 9, 2018. Owners may contact Maserati
 customer service at 1-877-969-2737. Maserati
 ’s number for this recall is 363.
Notes
Owners may also contact the National Highway Traffic Safety Administration Vehicle Safety Hotline at 1-888-327-4236 (TTY 1-800-424-9153), or go to www.safercar.gov.
Q&A
Management Summary of Maserati Safety Recall Campaign #363 Fuel Delivery Line Replacement
| Date: | December 2017 |
|---|---|
| Subject: | Maserati Safety Recall Campaign #363 – Fuel Delivery Line Replacement |
| Models: | Quattroporte and Ghibli Models – Model Year 2018 |
| Countries Involved: | World wide |
| Local Authorities: | NHTSA / Transport Canada |
| Defective Part: | Fuel Delivery Lines |
| Fuel Delivery Lines | Possible fuel leaks at the line connections |
| Responsibility: | Dytech Automotive Spa. /Maserati S.p.A. and MNA S.p.A. and MNA |
| Repair action: | Replacement of the fuel delivery line |
| Repair Time: | Approximately 2.5 hours for the V6 engine and 2.0 hours for the V8 engine. |
| Vehicles Involved: | 1406 U.S. and 86 Canadian vehicles |
| Production Period: | 2018 Model Year Quattroporte and Ghibli Models |
| Accidents/ Injuries: | None reported |
| Customer Contact: | Customers will be notified by first class mail. |
Q&A
| Q1. | Which models are affected by this recall? |
| A. | Model Year 2018 Quattroporte and Ghibli models. |
| Q2. | How many vehicles in North America are affected? |
| A. | There are a total of 1406 U.S. vehicles and 86 Canadian vehicles potentially affected. |
| Q2a. | How many vehicles globally are affected? |
| A. | There are approximately 2741 vehicles that are affected globally. |
| Q3. | What is the specific problem? |
| A. | There is the possibility that the fuel lines may weep or leak fuel as a result of an assembly process used by the supplier during fuel line production and assembly. |
| Q4. | What can happen? |
| A. | A weeping or leaking fuel line, over time, and in the worst case scenario, can lead to a fire in the engine compartment or underneath the vehicle. |
| Q5. | Can the driver become aware of the problem? |
| A. | Yes. A fuel odor or leak could occur along with the Check Engine Light being illuminated. |
| Q5a. | What should I do if I notice this condition in my vehicle? |
| A. | Call Maserati Roadside Assistance to bring your vehicle to the nearest authorized Maserati Roadside Assistance to bring your vehicle to the nearest authorized Maserati dealership. dealership.
The recall will be performed free of charge. |
| Q6. | What corrective measures will be taken? |
| A. | The Fuel delivery line from the fuel tank to the engine compartment will be replaced. |
| Q7. | How did Maserati become aware of the problem? become aware of the problem? |
| A. | After a vehicle quality analysis and investigation by Maserati , the issue was identified and corrective actions initiated. , the issue was identified and corrective actions initiated. |
| Q8. | Is Maserati aware of any accidents or injuries associated with the recall? A. None have been reported. aware of any accidents or injuries associated with the recall? A. None have been reported. |
| A. | None have been reported. |
| Q9. | Can customers continue to drive their cars? |
| A. | Yes, but we recommend that you take your car to the nearest dealer as soon as possible to have the recall performed. |
| Q10. | How will customers be informed of the recall? |
| A. | Customers will be notified by first class mail. Customers can also use the VIN recall lookup feature in Maserati ’s website under Tools and Services: https://www.maseratiusa.com/maserati/us/en/shoppingtools/recall-by-vin . ’s website under Tools and Services: https://www.maseratiusa.com/maserati/us/en/shoppingtools/recall-by-vin . |
| Q11. | How will the recall be performed? |
| A. | The authorized Maserati dealership will replace the fuel delivery line. dealership will replace the fuel delivery line. |
| Q12. | How long will the repair take? |
| A. | To replace the fuel delivery line, approx. 2.5 hours on a V6 engine and approx. 2.0 hours on a V8 engine. |
| Q13. | How many models have experienced this problem? |
| A. | To date, none have been reported in North America. |
| Q14. | When will I receive my owner notification letter? |
| A. | Within 60 Days. If a customer provides a VIN to MNA Customer Service, the need for a recall can be confirmed. Customers can also use the VIN recall lookup feature in Maserati ’s website under Tools and Services: https://www.maseratiusa.com/maserati/us/en/shoppingtools/recall-by-vin . ’s website under Tools and Services: https://www.maseratiusa.com/maserati/us/en/shoppingtools/recall-by-vin . |
| Q15. | Do I have to wait for my recall letter in order to have my recall performed? |
| A. | No, you can call the authorized Maserati dealership and they will advise you when to make the repair. Or, if you’d like, we (Customer Care) can conference you into your dealership to make the appointment now. dealership and they will advise you when to make the repair. Or, if you’d like, we (Customer Care) can conference you into your dealership to make the appointment now. |
| Q16. | Is it safe to drive my vehicle? |
| A. | Yes, but we recommend that you take your car to the nearest dealer as soon as possible to have the recall performed. |
| Q17: | When did the factory make the change in this part that is causing the recall? |
| A. | The factory made the change in 2018 MY production vehicles. |
| Q20: | How do I know that my car is not affected by this recall? |
| A. | A dealer can verify via VIN and individual inspection. Customers can also use the VIN recall lookup feature in Maserati ’s website under Tools and Services: ’s website under Tools and Services:
https://www.maseratiusa.com/maserati/us/en/shopping-tools/recallby-vin |
Q&A
Statement
Auburn Hills, MI, – Maserati North America, Inc. and Maserati
 Canada, Inc. will recall 1492 units of the Quattroporte and Ghibli, Model Year 2018 in North America.
This action has been proactively taken to replace the Fuel Delivery Line.
Maserati North America, Inc. and Maserati
 CA, Inc. are unaware of any related accidents or injuries.
The repair performed will be the installation of a new fuel delivery line from the fuel tank to the engine compartment.
Affected customers will be notified by Maserati North America, Inc. and Maserati
 Canada, Inc., via first class mail. Customers can also use the VIN recall lookup feature in Maserati
 ’s website under Tools and Services: https://www.maseratiusa.com/maserati/us/en/shopping-tools/recall-by-vin
There are 1406 cars affected in the US, and 86 in Canada.
Customers who are concerned may call 877-696-2737 (877- MyMaserati)
Maserati
| Date: December 20th, 2017 |
| Bulletin No. MAS001416 – Fuel Delivery Line Replacement – U.S. | |
| Safety Recall Campaign – 363 | |
| Supersedes: N/A | |
| Section: Compliance |
Model: Quattroporte (M156) and Ghibli (M157)
Model Year: 2018
Subject: Vehicle Safety Recall Campaign 363 – Fuel Delivery Line Replacement
MASERATI SAFETY RECALL BULLETIN
PERFORM THE PROCEDURE OUTLINED IN THIS TECHNICAL BULLETIN ON ALL AFFECTED NEW VEHICLES BEFORE CUSTOMER DELIVERY OR FOR VEHICLES ALREADY SOLD AND DELIVERED THE NEXT TIME THE VEHICLE IS IN THE SHOP FOR MAINTENANCE OR REPAIRS.
Maserati dealers must ensure recalls are completed after having been notified by Maserati
 North America, Inc. (MNA) that a safety-related defect or noncompliance exists in any motor vehicle or item of replacement equipment in the dealer’s possession at the time of notification. In MNA’s case, this notification would typically be made by the issuance of a recall notification in the form of a Technical Bulletin.
Under the National Traffic and Motor Vehicle Safety Act of 1966, as amended, if a recall campaign is announced by MNA, dealers must ensure that all recalls on new vehicles and new items of replacement equipment are completed BEFORE delivery to the consumer. This means that dealers may not legally deliver new motor vehicles or new items of replacement equipment to consumers with an open recall.
The Safety Act also prohibits dealers from selling or leasing the motor vehicle or item of replacement equipment, unless and until the open recall has been completed BEFORE delivery. This also pertains to items of replacement equipment.
Under the terms of the Certified Pre-Owned (CPO) program, CPO vehicles with an open recall may not be sold or delivered to the consumer.
Finally, MNA dealers should not sell or use parts that have been recalled by MNA. Please follow the specific instructions provided by MNA on the return or disposition of any parts.
Description of Vehicle Safety Recall 363
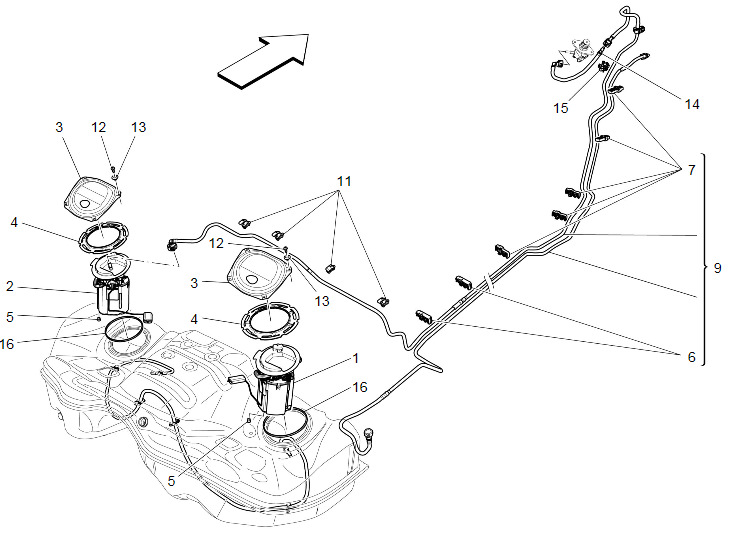
Maserati S.p.A. and MNA have determined that the above described vehicles were manufactured with fuel lines (Num. 9 in Fig.1) that may weep or leak fuel as a result of an assembly process used by a supplier during fuel line production. Potential fuel leaks may occur at any location along the fuel line due to the introduction of foreign particles between the metal fuel line and plastic fuel line during the connection process (due to the supplier’s insufficient cleaning process of the fuel line), causing scratches on the plastic fuel line portion. A weeping or leaking fuel line, over time, and in the worst case scenario, can lead to a fire in the engine compartment or underneath the vehicle.
Fig.1
Which Vehicles Are Affected
Please refer to ModisCS+ and the attached VIN list at the end of this bulletin for the affected vehicles in the U.S. and Canada.
Vehicle Remedy Information
- Check that the vehicle is included in this Recall Campaign, and that this repair has not been previously performed.
- Install the new fuel delivery line kit as shown below.
- The recall procedure is now complete.
This repair procedure will be performed free of charge to the customer.
Parts Needed For The Recall
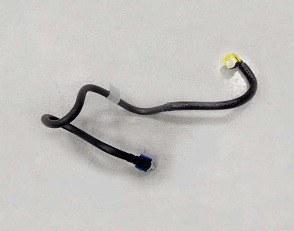
For this Recall Campaign, the fuel delivery line kit (3 lines and clamps) must be ordered from the Maserati Parts Department.
| Kit p/n | Model |
|---|---|
| 673007365 | M156 V6 AWD |
| 673007367 | M156 V8 |
| 673007369 | M157 V6 AWD |
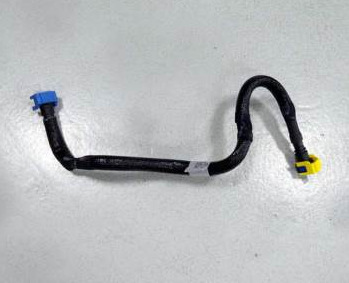
The original 1 piece fuel delivery line will now be replaced by the above kits which contain 3 lines. The engine connection line (1), the body line (2), and the fuel tank connection line (3).
OPERATING PROCEDURES FOR V6
NOTE: Perform this repair when the engine is cold.
NOTE: It is recommended that the fuel level be less than a half tank for this repair.
- Drive the vehicle on the lift.
- Disconnect the battery (Section 8.20.001 – 02 of the Workshop Manual).
- Use the fuel fill funnel located in the trunk to vent any fuel tank pressure by inserting it into the filler neck.
- Remove the rear seat cushion (Section 9.42.006 – 02 of the Workshop Manual).
- Remove the windshield water containment bay as shown below and in Section 9.15.016 – 02 of the Workshop Manual.
a. Remove the wiper arms and the engine cover panels.
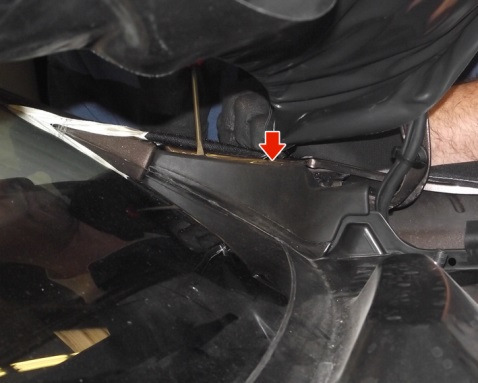
b. Using a Teflon wedge, remove the l/s and r/s windshield trim. (Fig.2)
Fig.2
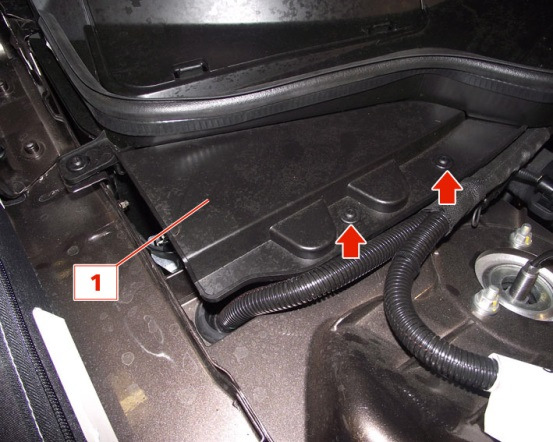
c. Remove the l/s and r/s inspection covers. (Fig.3)
Fig.3
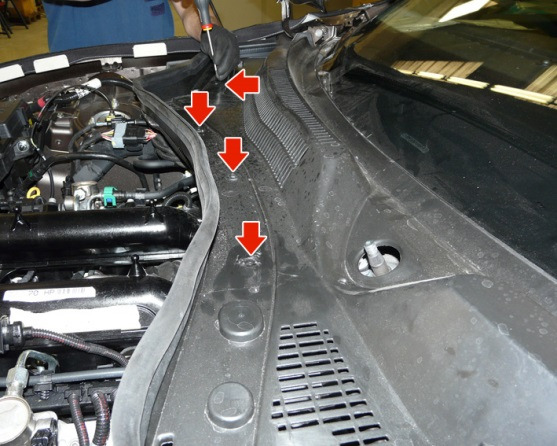
Fig.4
d. Remove the exterior lower windshield trim. (Fig.4)
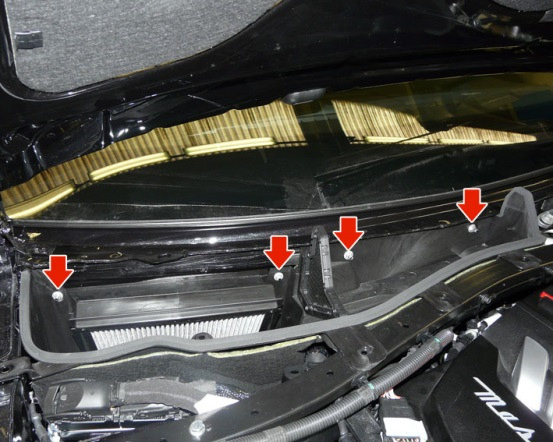
e. Remove the nuts holding the water containment tray. (Fig.5)
Fig.5
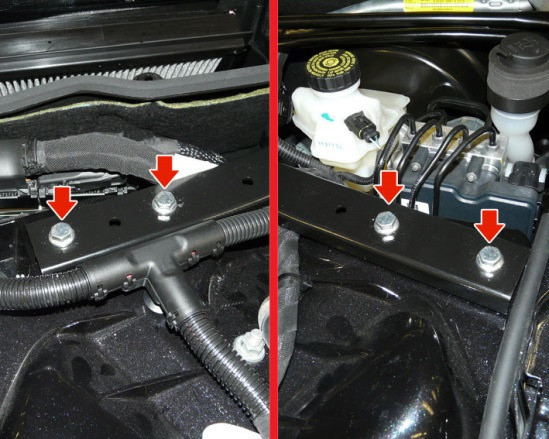
Fig.6
f. Remove the bolts on the engine compartment front cross member. (Fig.6)
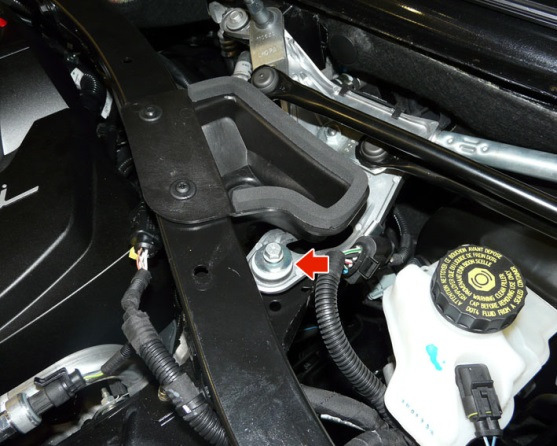
g. Remove the bolt between wiper linkage and the front cross member. (Fig.7)
Fig.7
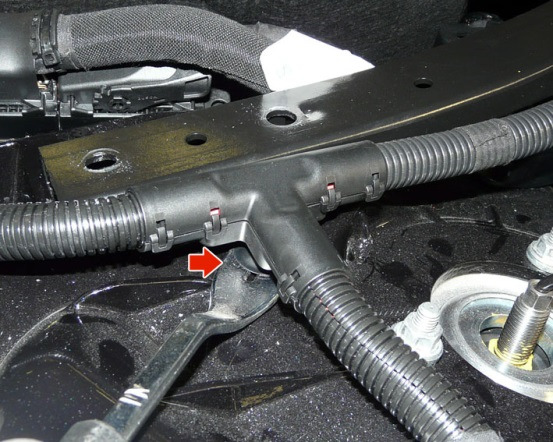
Fig.8
h. Unsnap the wire harness support clip and move the front cross member to the side. (Fig.8)
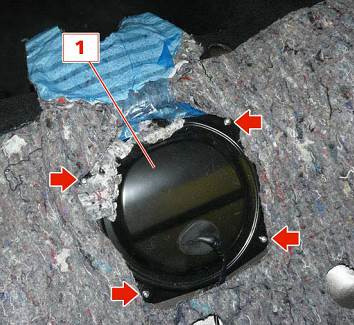
- Remove the 4 screws and then the l/s fuel pump inspection cover (Fig.9).
Fig.9
Fig.10
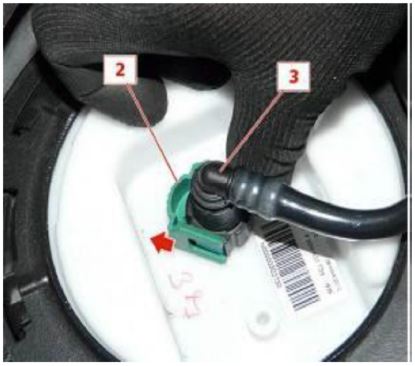
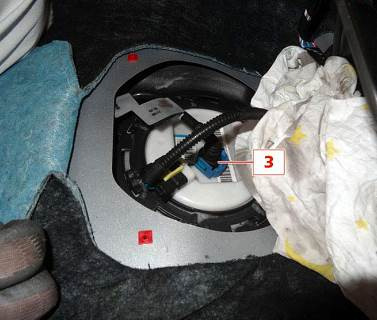
- Release the safety (2) and unsnap the quick release fuel delivery line (3) as shown in Fig.10.
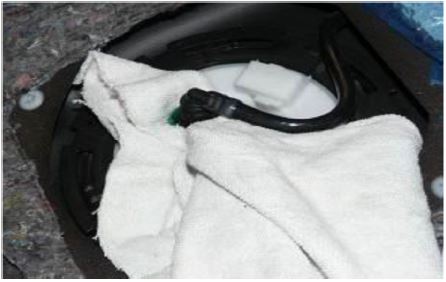
NOTE: Use an absorbent cloth to wipe off any residual fuel when disconnecting the delivery line from the pump as shown in Fig.11.
Fig.11
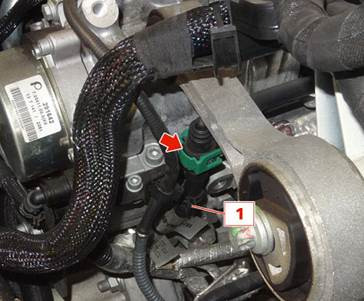
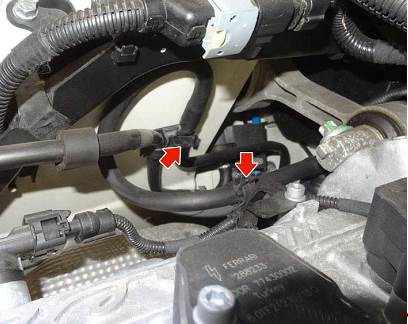
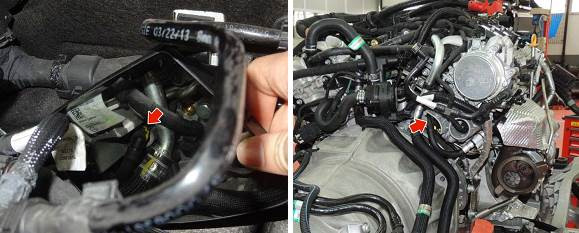
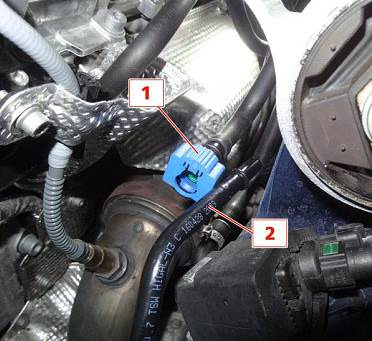
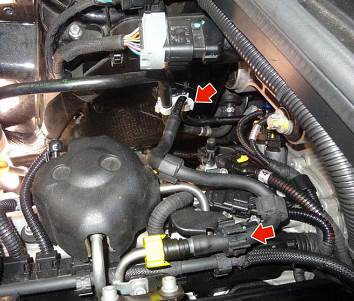
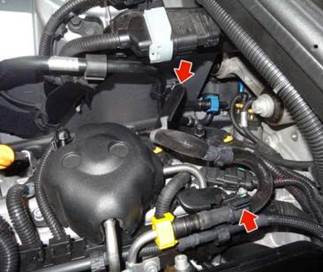
- In the engine compartment, remove the engine cover, release the safety and disconnect the fuel delivery line, then unclip the fastening clamp. (1 in Fig.12)
Fig.12
- Unclip the delivery line from the 2 fastening clamps. (Fig.13)
Fig.13
Fig.14
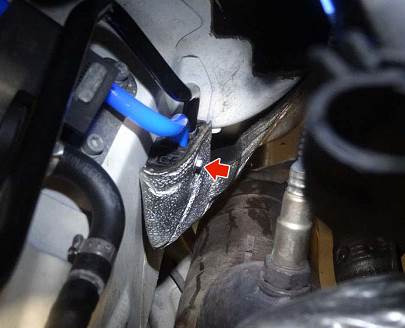
- Remove the screw on the heat shield between the engine and the r/s dome. (Fig.14)
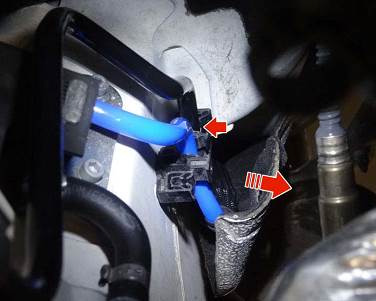
- Pull the heat shield back and then unclip the fuel delivery line from the securing clamp. (Fig.15)
Fig.15
Fig.16
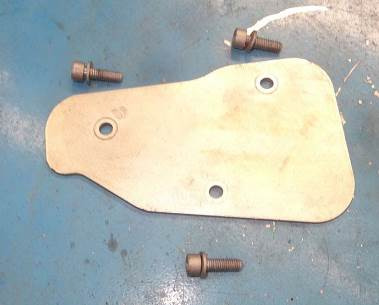
- Only on the Ghibli AWD, remove the 3 bolts and the metal plate behind the r/s cylinder head. (Fig.16)
- Release the safety and unhook the quick release on the fuel delivery line located behind the r/s cylinder head. (Fig.17)
Fig.17
- Replace the old fuel delivery line on the engine with the new fuel delivery line from the kit as shown in Fig.18.
Fig.18
- Remove the l/s and r/s central underbody panels as shown in sections 9.14.043 – 00 and 9.14.044 – 00 of the Workshop Manual.
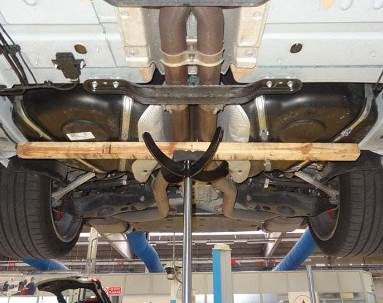
- Position a hydraulic lift with a brace to support the fuel tank as shown in Fig.19
Fig.19
Fig.20
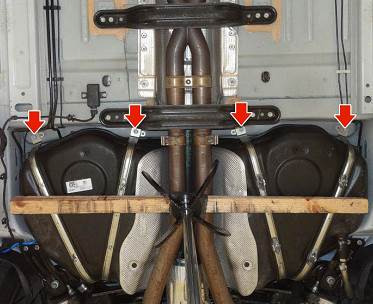
- Remove the bolts on the fuel tank support straps. (Fig.20)
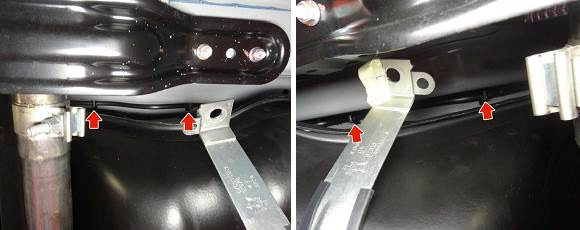
- Lower the fuel tank just enough to unsnap the fuel delivery line from the 4 clamps located between the fuel tank and the chassis. (Fig.21)
Fig.21
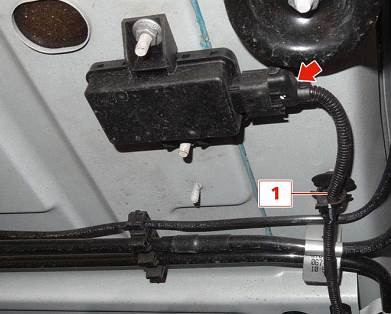
- On the TPMS sensor, unlock the safety tab and disconnect the wire connector, then release the harness fastener. (1 in Fig.22)
Fig.22
Fig.23
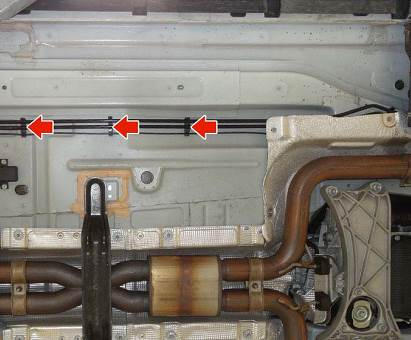
- Unclip the fuel delivery line from the 3 fastening clamps. (Fig.23)
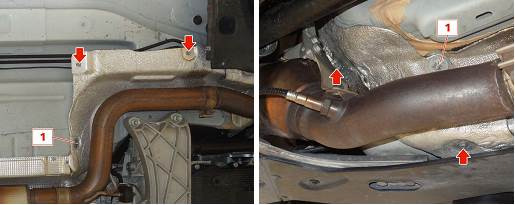
- Remove the heat shield screws and the fasteners (1) then remove the 2 heat shields as shown in Fig.24 and Fig.25.
Fig.24
Fig.25
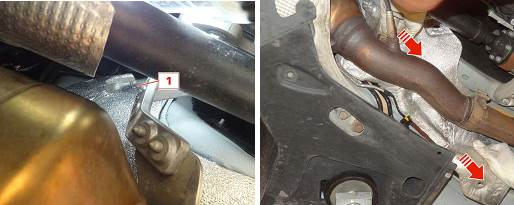
- Unclip the fuel delivery line from the clamps located between the engine and the r/s dome. (Fig.26)
Fig.26
Fig.27
- Unclip the fuel delivery line from the lower 2 clamps. (1 in Fig.27) Cut the old fuel delivery line (Fig.28) to facilitate the next several steps.
Fig.28
- With snap ring pliers, loosen the clamps and remove the remaining sections of the fuel delivery line. (Fig.29)
Fig.29
- Install the new fuel lines following the removal procedures in reverse order.
- Secure the new engine line into the engine compartment clamps. (Fig.30)
Fig.30
Fig.31
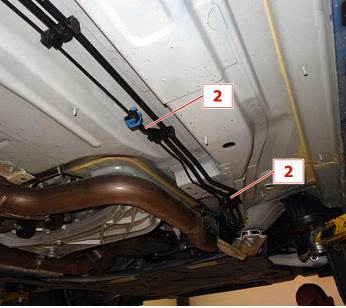
- Attach the new body delivery line to the engine delivery line and snap the lock closed. (Fig.31)
Fig.32
Fig.33
- Attach the new tank delivery line to the fuel pump. (3 in Fig.32)
- Snap the new delivery line into the securing clamps. (2 in Fig.33)
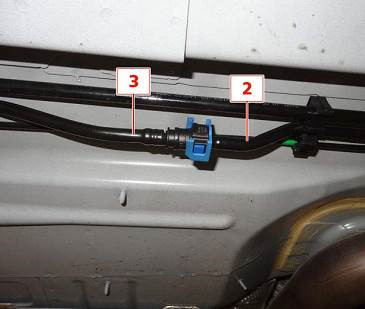
- Attach the new tank delivery line (3) to the new body delivery line (2) and snap the lock closed. (Fig.34)
Fig.34
Fig.35
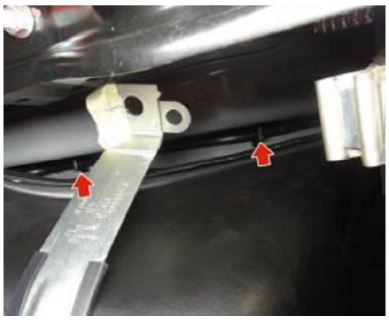
- Snap the new tank delivery line into the securing clamps above the fuel (Fig.35)
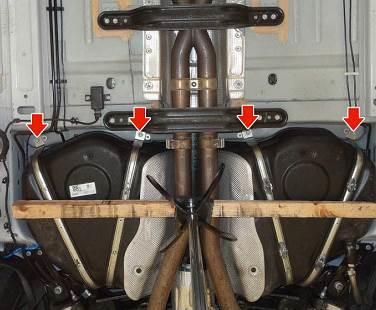
- Tighten the fuel tank strap bolts to 35Nm. (Fig.36) and remove the lift.
Fig.36
- With the new fuel delivery lines installed and secured, perform the following function test of the system before re-installing the rear seat cushion and the windshield water containment bay.
a. Cycle the ignition to the run position and leave on for 30 seconds, during these 30 seconds inspect the connections and tubing for any signs of fuel leakage.
b. Repeat the ignition cycle one additional time prior to cranking engine.
Verify that there are no leaks in the system.
- Re-install the remaining components.
OPERATING PROCEDURES FOR V8
NOTE: Perform this repair when the engine is cold.
NOTE: It is recommended that the fuel level be less than a half tank for this repair.
- Drive the vehicle on the lift.
- Disconnect the battery (Section 8.20.001 – 02 of the Workshop Manual).
NOTE: Use the fuel fill funnel located in the trunk to vent any fuel tank pressure by inserting it into the filler neck.
- Remove the rear seat cushion as shown in Section 9.42.006 – 02 of the Workshop Manual.
- Remove the 4 screws and then the l/s fuel pump inspection cover. (Fig.1)
Fig.1
Fig.2
- Release the safety (2) and unsnap the quick release on the fuel delivery line (3) as shown in Fig.2.
NOTE: Use an absorbent cloth to wipe off any residual fuel when disconnecting the delivery line from the pump as shown in Fig.3.
Fig.3
Fig.4
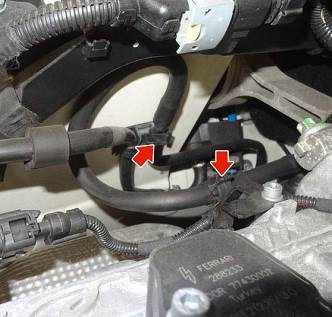
- In the engine compartment, remove the engine cover then release the engine fuel delivery line from the securing clamps. (Fig.4)
Fig.5 Fig.6
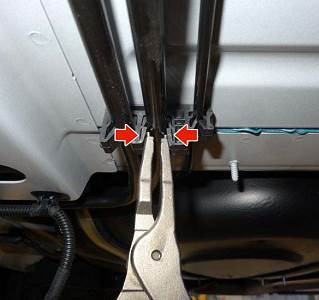
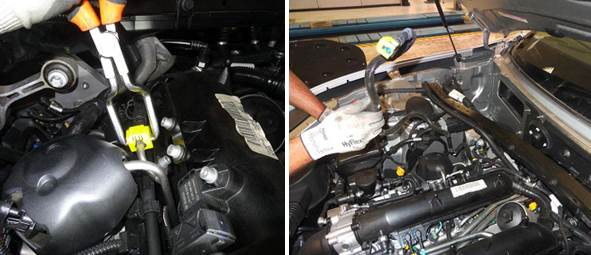
- Disconnect the engine fuel delivery line from the body fuel delivery line with pinch pliers (e.g. Mac Tools P11LRGLA, 11” pliers) as shown in Fig. 5.
- Remove the engine fuel delivery line. (Fig.6)
- Remove the l/s and r/s central underbody panels as shown in sections 9.14.043 – 00 and 9.14.044 – 00 of the Workshop Manual.
- Position a hydraulic lift with a brace to support the fuel tank as shown in Fig.7.
Fig.7
Fig.8
- Remove the bolts on the fuel tank support straps. (Fig.8)
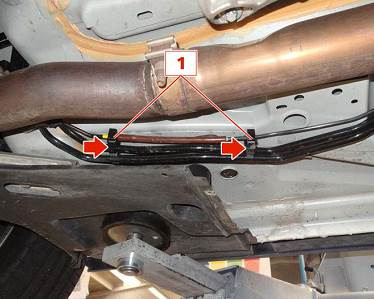
- Lower the fuel tank just enough to unclip the fuel delivery line from the 4 clamps located between the fuel tank and the chassis. (Fig.9 and Fig.10)
Fig.9 Fig.10
- On the TPMS sensor, unlock the safety tab and disconnect the wire connector, then release the harness fastener (1 in Fig.11).
Fig.11
Fig.12
- Unclip the fuel delivery line from the 3 fastening clamps. (Fig.12)
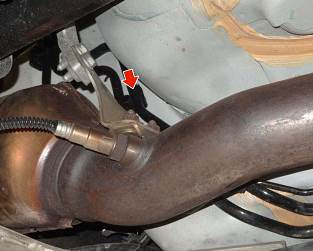
- Remove the heat shield screws and the fasteners (1) then remove the 2 heat shields as shown in Fig.13 and Fig.14.
Fig.13
Fig.14
- Unclip the fuel delivery line from the clamps located between the engine and the r/s dome. (Fig.15)
Fig.15
Fig.16
- Unclip the fuel delivery line from the lower 2 clamps. (1 in Fig.16)
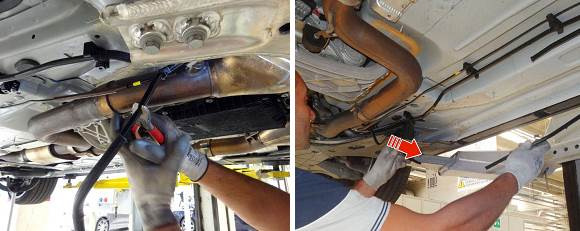
- Cut the old fuel delivery line (Fig.17) to facilitate the next several steps.
Fig.17
- With snap ring pliers, loosen the clamps and remove the remaining sections of the fuel delivery line. (Fig.18)
Fig.18
- Install the new engine delivery line (Fig.19) into the engine compartment clamps. (Fig.20)
Fig.19
Fig.20
- Attach the new body delivery line (2) to the engine delivery line (1) and snap the lock closed. (Fig.21)
Fig.21
Fig.22
- Attach the new tank delivery line to the fuel pump. (3 in Fig.22)
- Snap the new delivery line into the securing clamps. (2 in Fig.23)
Fig.23
Fig.24
- Attach the new tank delivery line (3) to the new body delivery line (2) and snap the lock closed. (Fig.24)
- Snap the new tank delivery line into the securing clamps above the fuel tank. (Fig.25)
Fig.25
Fig.26
- Tighten the fuel tank strap bolts to 35Nm. (Fig.26) and remove the lift.
- With the new fuel delivery lines installed and secured, perform the following function test of the system before re-installing the rear seat cushion.
a. Cycle the ignition to the run position and leave on for 30 seconds, during these 30 seconds inspect the connections and tubing for any signs of fuel leakage.
b. Repeat the ignition cycle one additional time prior to cranking engine. Verify that there are no leaks in the system.
- Re-install the remaining components.
NOTE: Dispose of the old fuel line according to all Local and Federal Environmental Guidelines.
Warranty Information
| • Campaign Number | 363 |
| • Warranty Code | 24 |
| • Defect Code | 063 |
| • Component code | 1.43.109 |
| • Labor Operation for V6 engine vehicles | 1.43.109.9 (2.25h) |
| • Labor Operation for V8 engine vehicles | 1.43.109.8 (1.7h) |
| • Component Part Number | See parts section |
 Loading...
 Loading...
 Loading...
 Loading...
 Loading...
 Loading...
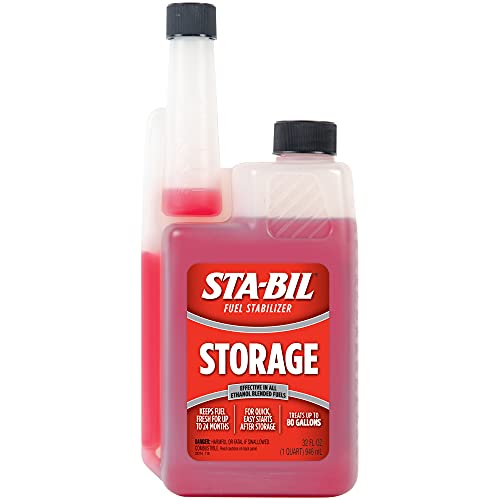
- Keeps fuel fresh for up to 24 months during storage
- Eliminates need to drain fuel prior to storage
- Ensures quick, easy starts after storage
- Effective in all gasoline, including ethanol blends
- For all gasoline engines, including 2-cycle
- Cleans injectors, valve seats, combustion chambers and other critical fuel components
- Stabilizes fuel and prevents varnish & gum formation in ethanol and gasoline
- Combats deposits and protects your engine oil lubricants from the harmful effects of alcohol combustion
- ALL-ROUND ENGINE SOLUTION - Works in all engines and all fuels, making it the ideal fuel treatment and stabilizer for any vehicle or gas powered tool
- ETHANOL PROBLEM SOLVER - Prevents and cures most ethanol-related issues, including poor performance and decreased fuel economy
- OLD FUEL REVITALIZER - Stabilizes fuel up to 2 years and can help rejuvenate old, sub-spec fuel, even after months of inactivity
- FUEL ECONOMY MAXIMIZER - Removes and prevents gum, carbon deposits, and varnish build-up, resulting in improved fuel economy
- WATER BUILD-UP PREVENTION - Disperses water throughout fuel as submicron-sized droplets that are safely eliminated while the engine operates
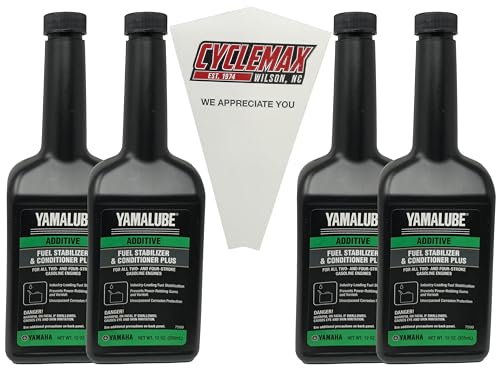
- Yamaha Original OEM Yamalube (1) ACC-FSTAB-PL-32
- Strongly recommended for E10 fuels, this alcohol-free formula helps prevent fuel oxidation (when ethanol absorbs moisture from the air) and phase separation from moist, rich air.
- When used continuously, it keeps fuel fresh, potent, and free from gum and varnish for up to one year of storage. Its metal filmers, provide extensive protection for steel and aluminum components.
- May be used with Yamalube Ring Free Plus.
- Normal usage is 1 oz. Fuel Stabilizer & Conditioner PLUS to every 3 gallons of fresh gasoline. For storage over 2 months add 1 oz of Fuel Stabilizer & Conditioner to every 1 gallon of fresh gasoline. Run the engine for several minutes to circulate the treated fuel and top off the tank with treated fuel to minimize condensation in the tank.
- Cleans injectors, valve seats, combustion chambers and other critical fuel components
- Stabilizes fuel and prevents varnish and gum formation in ethanol and gasoline
- Combats deposits and protects your engine oil lubricants from the harmful effects of alcohol combustion
- Size: 5.25 oz.
- OUR CYCLEMAX PACK CONTAINS: Four Bottles for Yamaha Yamalube Fuel Stabilizer & Conditioner Plus ACC-FSTAB-PL-12 along with a Convenient Disposable Funnel
- QUALITY YOU CAN COUNT ON: Includes premium quality products to provide exceptional performance and protection for your Yamaha engine.
- COMPATIBILITY AND CONVENIENCE: Strongly recommended for E10 fuels, this alcohol-free formula helps prevent fuel oxidation (when ethanol absorbs moisture from air) and phase separation from moist, rich air. When used continuously, it keeps fuel fresh, potent, and free from gum and varnish for up to one year of storage. Its metal filmers, provide extensive protection for steel and aluminum components.
- OUR CYCLEMAX PACK CONTAINS: Four Quarts for Yamaha Fuel Stabilizer & Conditioner Plus ACC-FSTAB-PL-34ACC-FSTAB-PL-32 along with a Convenient Disposable Funnel
- QUALITY YOU CAN COUNT ON: Includes premium quality products to provide exceptional performance and protection for your Yamaha engine.
- COMPATIBILITY AND CONVENIENCE: Highly concentrated Yamalube Ring Free PLUS is a proven engine deposit cleaning package. When used as directed, this top-quality deposit-control system removes deposits from fuel injectors, carburetors, intake valves, intake ports, and combustion chambers. These harmful deposits, often the result of low-quality gasoline, may cause knocking/pinging, power loss, hesitation, shortened spark plug life, piston ring sticking, and even expensive engine damage.
- New Standard of Antioxidants and Anticorrosives
- Proprietary top-tier detergent reduces the need for higher octane as the machine ages
- Phase separation inhibitor
- Helps bond 2 cycle Oil to gasoline/ethanol mix
- Combustion Cool Technology ( CCT)
- OUR CYCLEMAX PACK CONTAINS: Two Quarts for Yamaha Fuel Stabilizer & Conditioner Plus ACC-FSTAB-PL-33ACC-FSTAB-PL-32 along with a Convenient Disposable Funnel
- QUALITY YOU CAN COUNT ON: Includes premium quality products to provide exceptional performance and protection for your Yamaha engine.
- COMPATIBILITY AND CONVENIENCE: Highly concentrated Yamalube Ring Free PLUS is a proven engine deposit cleaning package. When used as directed, this top-quality deposit-control system removes deposits from fuel injectors, carburetors, intake valves, intake ports, and combustion chambers. These harmful deposits, often the result of low-quality gasoline, may cause knocking/pinging, power loss, hesitation, shortened spark plug life, piston ring sticking, and even expensive engine damage.
Last update on 2025-04-16 / Affiliate links / Images from Amazon Product Advertising API
This product presentation was made with AAWP plugin.
